Batch Processing Images Using Photoshop
The following is a tutorial on creating an action in Photoshop while prepping an image for the web. An action is an excellent way to automate several steps, but it's not necessary to record and create an action for just a few images. You can always perform the steps below manually.
Adobe Lightroom and programs like it are designed for editing and handling images in large volumes. If you have the option, Lightroom is great for working with a large volume of images.
Here are the general steps we're going to take:
- Open raw file and make adjustments in ACR (Adobe Camera Raw)
- Resize/resample the image to an appropriate size for the destination
- Sharpen if necessary
- Save the image to a new file at an appropriate compression level
The ideal file size for web-ready images depends on the image's target display size, but should almost always be under 1MB.
If you have 5-10 (or more) high resolution images to work with, you can follow along.
First you'll need some folders. Drop your files in the appropriate folder:
images/
├── raw/
├── jpeg-high-quality/
└── jpeg-web-ready/
If you're starting with high-quality jpegs you can ignore the raw folder and the next step.
Covert RAW to Jpeg
If you have raw files, convert them to a high-quality jpeg using the following settings:
- Adjust exposure, white balance, etc. as needed.
- Leave them original size.
- Assign them to sRGB color space.
- If you're using Lightroom save them at quality 85.
- If you're using ACR (Adobe Camera Raw) and saving out of Photoshop, Level 10. In my personal testing they are roughly equivalent.
While it may seem strange, many professional labs and printing companies accept nothing more than sRGB, Level 10 jpegs for printing. Also, there is no perceivable difference between Photoshop's level 10 and level 12 (the highest). It's only wasting space.
Open the Image for Processing
Ok, now you've got some high quality jpegs that need to be saved down for the web.
For this demo we are saving a jpeg to a jpeg which runs the file through compression twice. Generally this is a bad practice, but if the original quality is high enough it won't be noticeable.
Open one of the high quality jpegs in Photoshop.
We're going to create and record a Photoshop action using one file, then replay the action on all of them.
Before we go any further, duplicate the image (Image > Duplicate...), change the name to note something about being web ready, and close the original in case we make any mistakes.
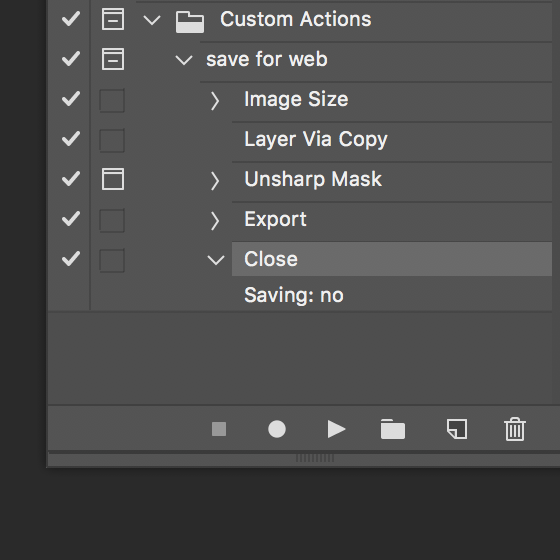
Open the actions palette (OPT+F9) and create a new action.
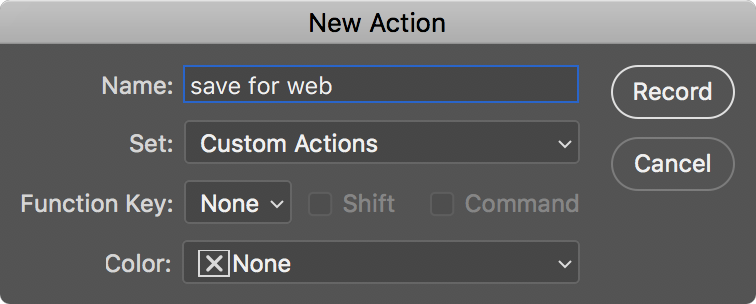
Name it something like "save for web" and hit OK. You'll now see an active "recording" icon. Photoshop is now recording all of the edits we make on our image.
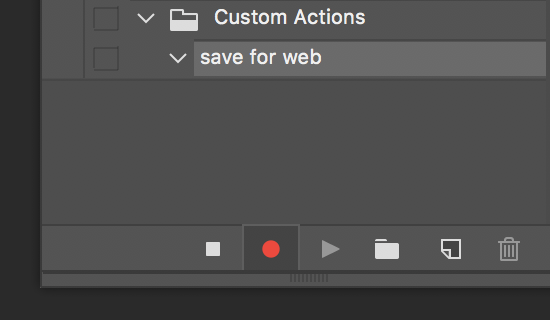
If you make a mistake, you can always hit the stop button to stop recording temporarily. Each step you've recorded under the action can be deleted or rearranged individually.
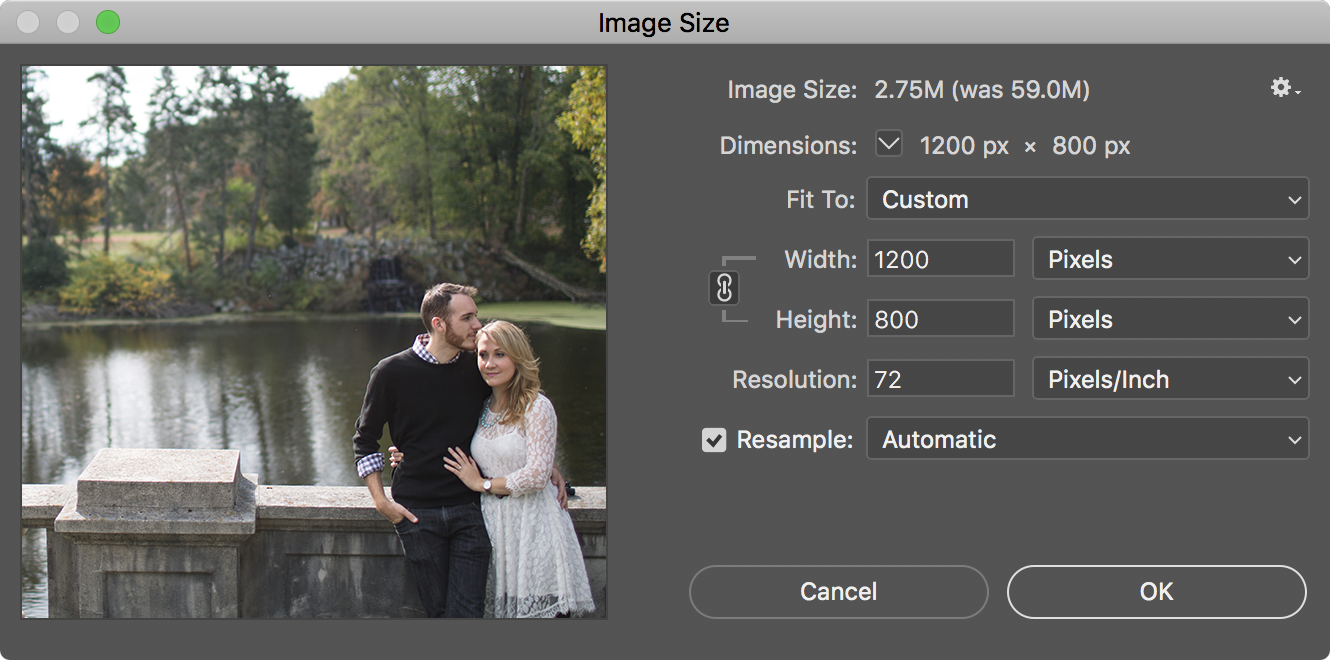
Resize the image under Image > Image Size... (CMD+OPT+I).
- Use 72dpi.
- Choose a resampling method. "Automatic" is usually fine.
- Choose a size that is no smaller than your intended display size. About 2x the intended display size is good for retina displays. Most importantly, you should never have to scale an image back up when displaying in the browser.
Sharpen the image if needed.
- The Automatic image resizing method usually applies enough sharpening.
- If the image needs more, duplicate the background layer (
CMD+J) and use Filter > Sharpen > Unsharp Mask.
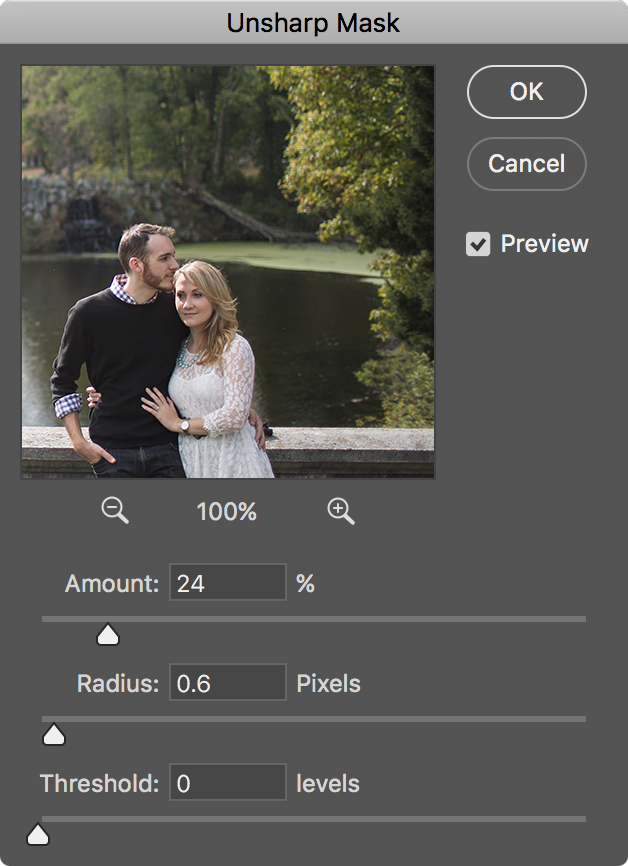
- Settings here depend on the image. Play with the Amount and Radius settings. The radius is usually pretty small.
- Since you're sharpening on a new layer, you can toggle the layer's visibility and turn down its opacity to reduce the effect. Be careful not to over sharpen.
Save for Web
Now we're ready to save. Get your save for web claw ready. To save the image out, go to File > Export > Save for Web (Legacy)... (CMD+OPT+SHIFT+S).
Save for Web is different than regular Save As... > jpeg. It offers more control, uses different algorithms, and strips extraneous metadata from the images.
You might be surprised how much metadata is often attached to photos.
Photoshop's Save for Web function is extremely good at producing the smallest possible jpeg file size. It reduces the file as much as possible with the least compromise in image quality.
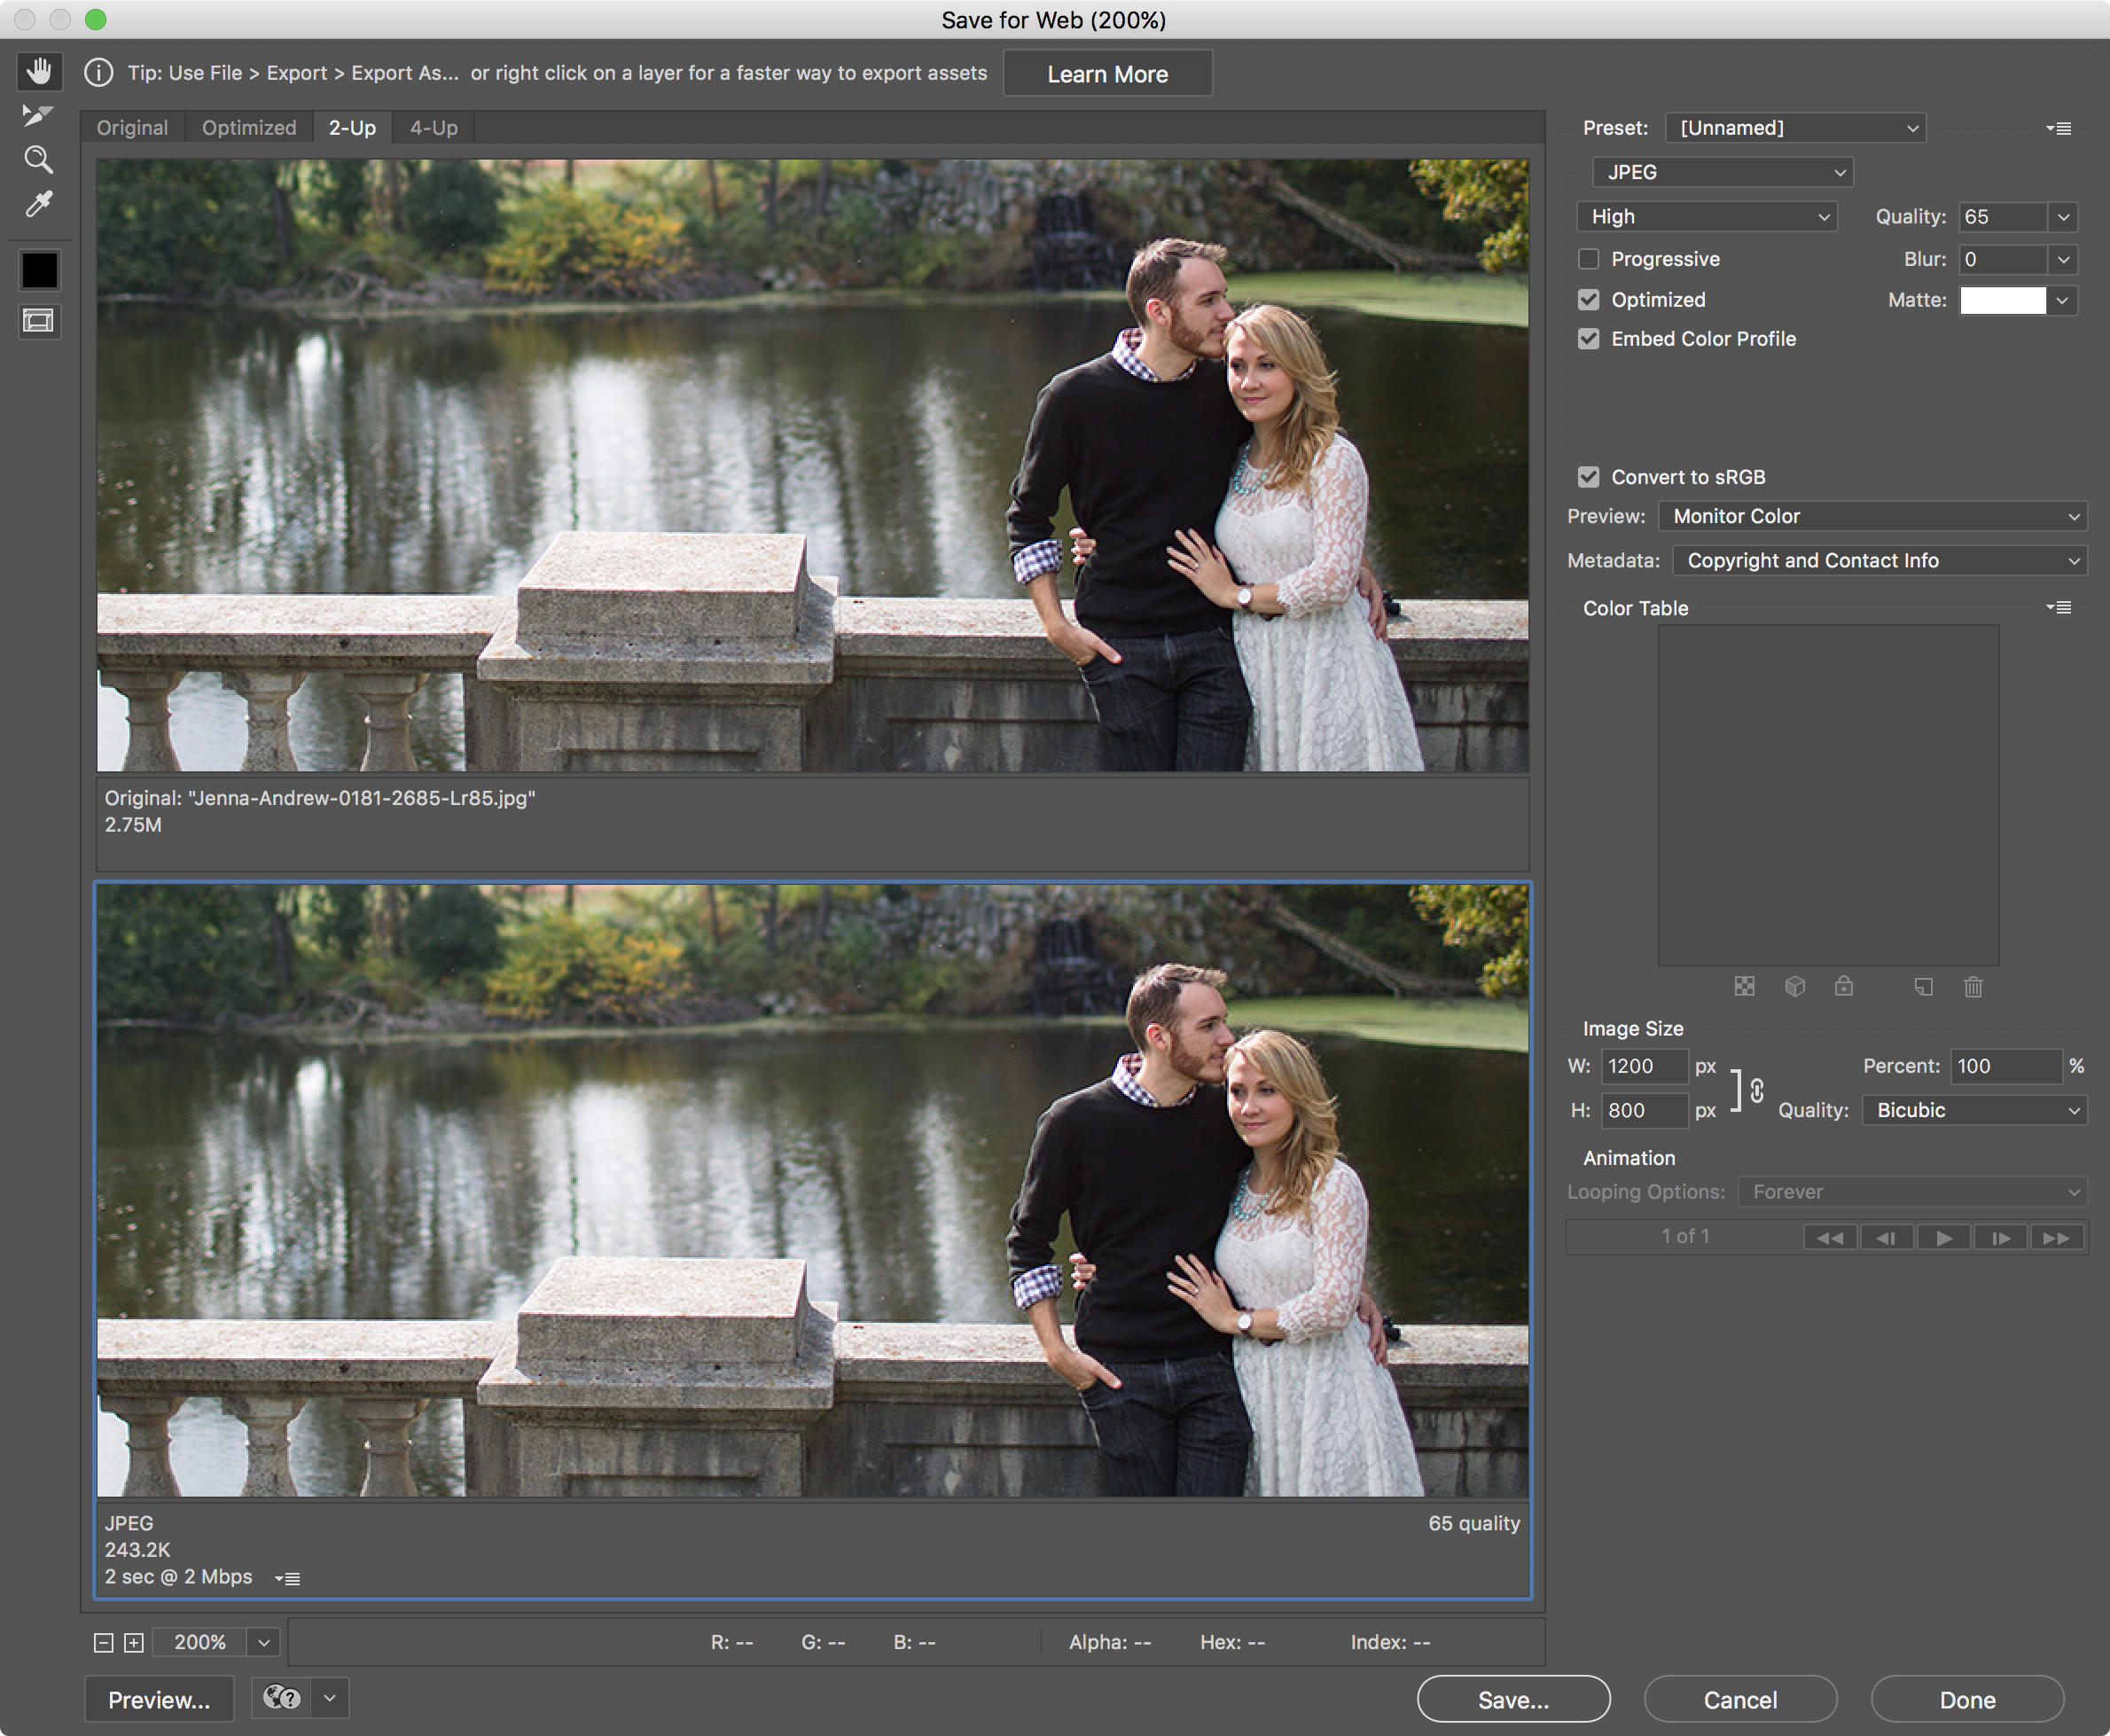
- Select jpeg for the file type.
- Set the quality as low as possible without any visible artifacts. This will depend on both the image size and its content. You can preview what it looks like to the left, and compare it to the original in the "2-Up" tab.
- The more oversized your image is, the more you should be able to compress it.
- Select "Optimized" and "Embed Color Profile"
- Make sure "Convert to sRGB" is selected.
- Optionally, choose what metadata you want to preserve.
- I prefer to keep my resizing step separate in the recorded action, but you can also perform resizing here.
- When you're ready, hit Save. "Done" will simply save your settings and dismiss the window without saving an actual file.
Save to the jpeg-web-ready/ folder. Do not change the name of the file here. If you change the name, that name gets added to the action we're creating, and every image we play this action on will be given the same name.
Close the image that's open without saving. We've already saved the web ready version.
Stop the action. You'll see a summary of all the steps. You can expand each one by clicking the triangle next to it to see all of the settings that were recorded.
All of the steps we just took can now be repeated simply by selecting the action and hitting the play button.
Go ahead and test it if you want. Open another high quality image and play the action.
You can toggle steps on and off by clicking the check marks next to them in the actions palette. The action simply skips any step that's unchecked.
You can also have the action pause at any dialog to let you tweak the settings, by clicking the box icon next to the check mark. The action will stop at that step, show you the dialog to change the settings, and resume when you're done. In the image above I turned this on for my Unsharp Mask step.
Automate
Here's the cool part. Photoshop can run a selected action on an entire folder of photos.
Delete any files you've already created in the jpeg-web-ready/ folder.
Now go to File > Automate > Batch...
While working in Adobe Bridge, you can also access this dialog under Tools > Photoshop > Batch...
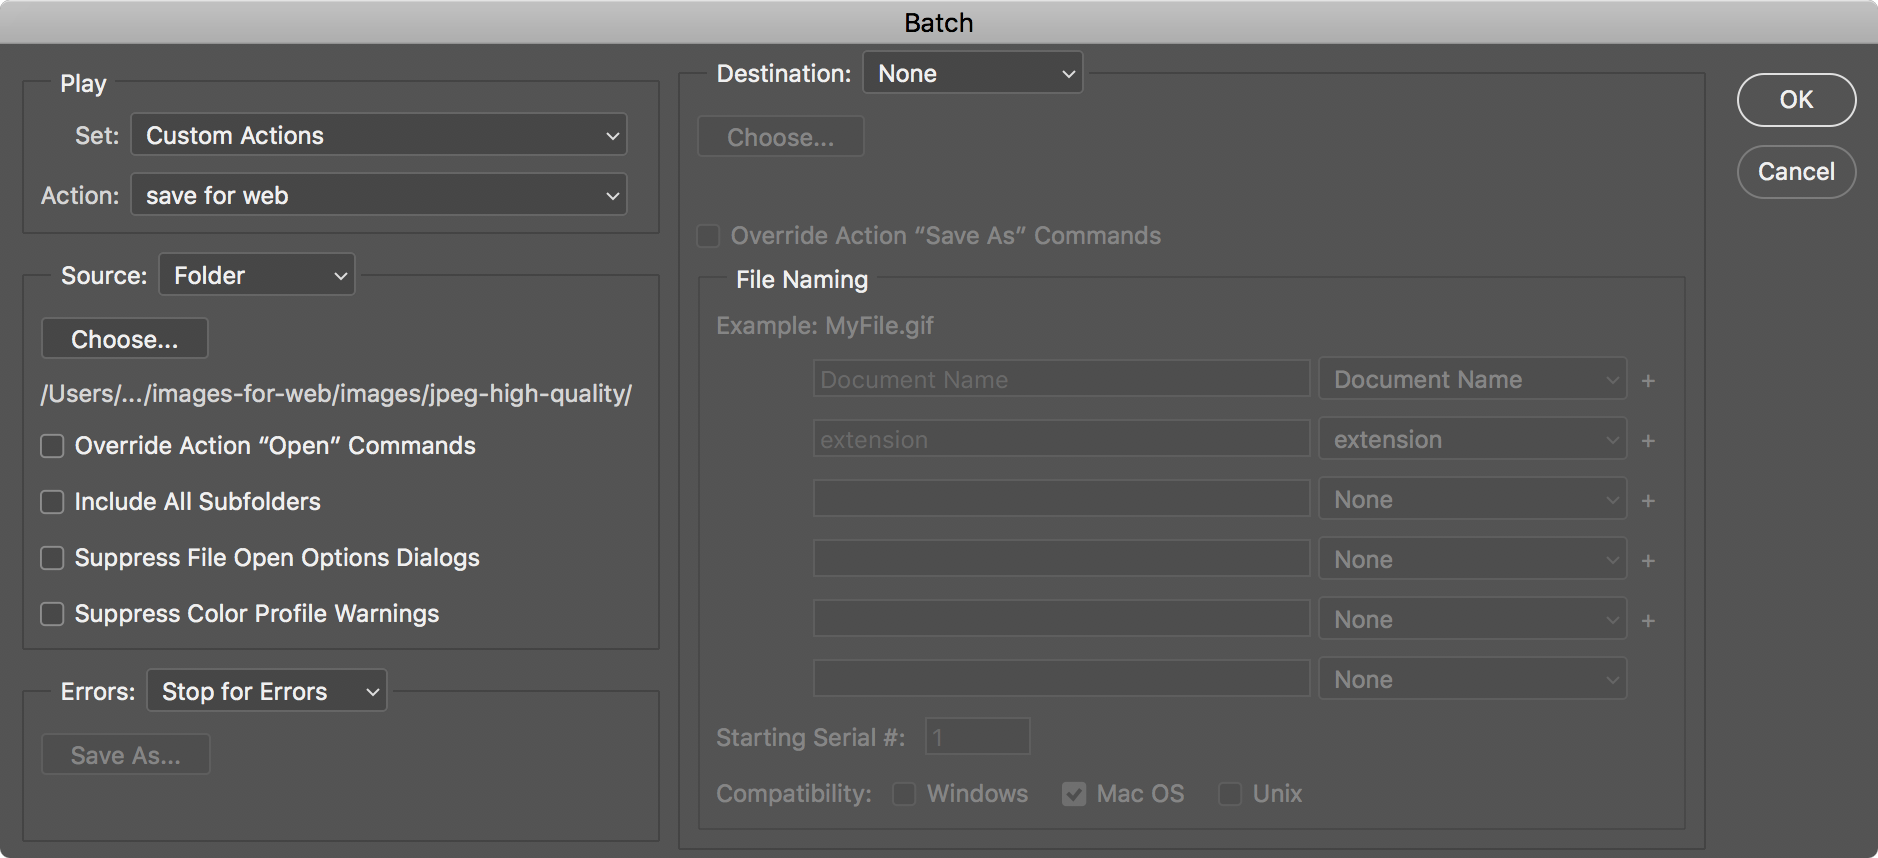
- Select the action and choose the source folder.
- We already have a save and close step as part of our action, but the batch dialog can handle that step for us as well. We can also rename the files as they're being saved.
- When you're ready, hit OK and watch Photoshop go to work. If the image files are very large or there are a lot of them, it may take a few minutes.
That's it! Again, Adobe Lightroom and programs like it make batch editing easier than a photoshop action. But this method is the next best thing in the absence of a batch editor, and it uses an excellent jpeg rendering engine.