Intro to HTML
Demo starter files and file path exercise
Today we're diving in head first, with HTML.
HTML stands for HyperText Markup Language. In the simplest terms, it allows us to outline and define the different types of content on a web page. Headings, text, lists, links... everything in an HTML document must be surrounded by "tags" annotating the different parts. In this way, HTML gives us a standardized method for distributing content on a variety of different browsers and devices.
But first...
What's a Browser?
One of the things computers have to establish when talking to each other is what protocol they're using.
"I see you over there! But how should we communicate? Phone call, text message, or email?"
The vast majority of content on the web is transmitted using a method called the HyperText Transfer Protocol (HTTP). HTTP is a request-response form of communication between computers. On one end is the client making a request for information. On the other is a server that dishes it out.
A web browser is a computer program that makes navigating and viewing web content practical and easy. When you direct your browser to a web address, it sends a request to the appropriate server and awaits a response. If all goes according to plan, the server acknowledges and sends back the requested HTML document (and usually a bunch of other stuff). Your browser then interprets and displays the information appropriately, as it downloads.
The modern web is constantly and rapidly changing. You will be reminded of this numerous times throughout our class. Nowadays, browsers do a lot more than simply request and display static pages. They handle advanced animation and graphics, interactive web applications, encrypted communications, and more. We'll discuss many of these aspects of the web, but the scope of this class barely scratches the surface!
We are going to focus mostly on front-end development, that is HTML and CSS. Together, they create the visual appearance, layout, and navigation of a web page. HTML and CSS are very approachable as far as programming languages go. They're mostly just markup - a kind of grammar that browsers understand. Back-end development, which we'll only touch on, is more about storing and handling data using other languages.
Anatomy of an HTML Document
An HTML document has two main parts: the head and the body.
The head contains mostly metadata - information about the information on the page. This includes things like keywords, character encoding, and other resources that the page needs for the browser to display it. Nothing in the head of an HTML document is ever displayed on the web page.
The body is where all of the content that will be displayed goes. Let's draft our first HTML document and go over some of the basic tags to get started.
Open the folder for the demo starter files in a plain text editor, and create a new document.
We need to declare the DOCTYPE on the first line of every HTML document. This tells the browser what type and version of HTML we're using. You may come across older and more complicated looking declarations than this, but HTML5 is the latest version, and its declaration is very simple:
<!DOCTYPE html>Tags, or elements, in HTML are delimited from the content itself by < and >. Most tags in HTML enclose text and other tags, so they have an opening <tag> and a closing </tag>.
HTML5 requires that all tags be properly nested. This is very important. The best analogy I can give you is that it's like Russian nesting dolls.

Here's the setup for a bare-bones HTML document:
<!DOCTYPE html>
<html lang="en">
    <head>
        <meta charset="utf-8">
        <meta name="viewport" content="width=device-width, initial-scale=1.0">
        <title>Hello World</title>
    </head>
    <body>

    </body>
</html>
Let's take a minute to dissect this.
- The
<!DOCTYPE>is the only tag that ever goes outside of the nested structure of the document, and always on the very first line. - One set of
<html>tags contains everything in the document's nested structure.<html>is often called the "root element" for this reason. - We've got our two main parts,
<head>and<body>, inside the<html>tags. - Almost every tag has a matching closing tag. There are only a few tags that don't require a matching closing tag because they never enclose other content.
<!DOCTYPE>and<meta>are two of them. - There are a couple of
<meta>tags. The character set is almost as important as the doctype, and it tells the browser what kind of text encoding we're using. The details aren't important for now other than to say we will always include this, and we'll always use UTF-8. - The other meta tag, for the
viewport, tells the browser that this page is mobile-ready. Everything we build should be mobile responsive, so it's not necessary for smaller devices to scale our pages down. - The
<title>tag defines a page title for displaying in the browser's tab or window. - HTML tags can have attributes which are always defined as
<tag attribute="value">. You should always put the value of the attribute in quotes. - The attribute in
<html lang="en">is a hint to the browser that this page will be in English. While not required, it's helpful for a lot of things... translation, hyphenation, decimal formatting, screen readers, and more.
Notice the way I tabbed and spaced things. Except for the first space between words, HTML ignores all whitespace. This gives us a lot of freedom to arrange the code in a way that's readable. Even though your browser doesn't care about the whitespace, humans will (including you!). Readability is very important.
Save your file with the name index.html so we can test it. If you're working off the starter files, save it in the parent folder. Since the <body> is still empty, you should see a blank page when opened in a browser.
Tag Vocabulary
HTML has many tags for describing different kinds of content. Check out the HTML Tag Reference for a list of the more common tags, with links at the bottom to additional references.
Let's try some of these tags out in the body of our document.
Images and Links
Okay, now some more interesting stuff.
Images
Here's the code to insert an image:
<img src="images/my-image.jpg" alt="photo of me">img tags require two attributes, a src (source), and alt (alternative text). The alt text is displayed if the image can't be loaded.
HTML5 requires the inclusion of the alt attribute for all images. This should be a short textual description of what the image contains. It's always a good idea to write something, but you can leave it empty (e.g. alt="").
You might wonder in what situation can't an image be loaded? Lots of reasons! The image file could have moved and the src path is no longer correct. The server could be having a problem. The browser might not support a given image format, or the image file itself could have a problem. The browser might not support images at all, like a screen reader or a search engine.
This will insert an image from the source images/my-image.jpg. If you don't supply a full web address (beginning with http://), it's important to note that the browser follows this path relative to the page you're on.
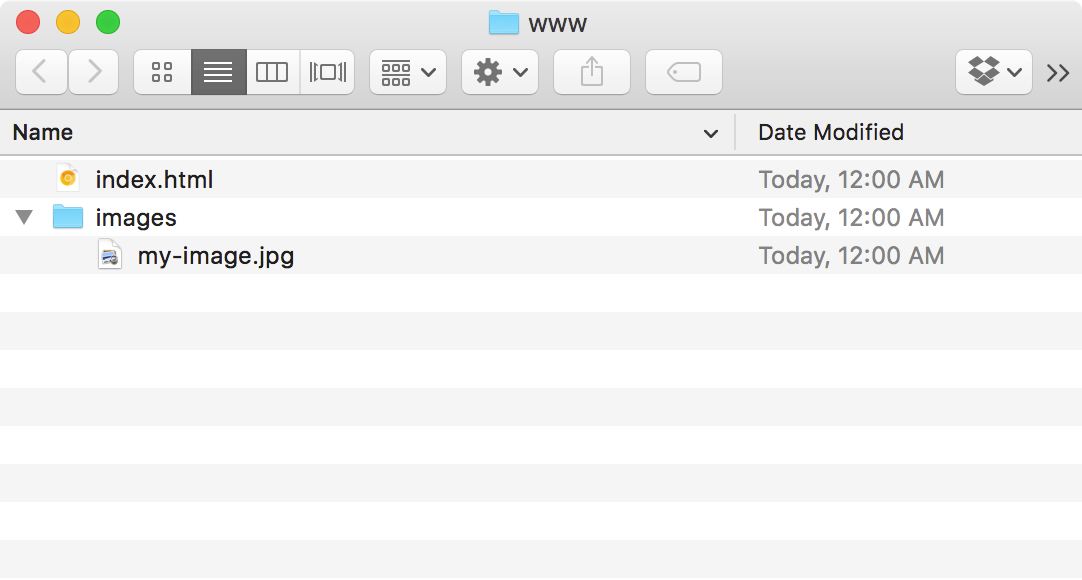
If I save index.html next to my images/ directory, as below, this will work perfectly. "From here, go into images, then find my-image.jpg"

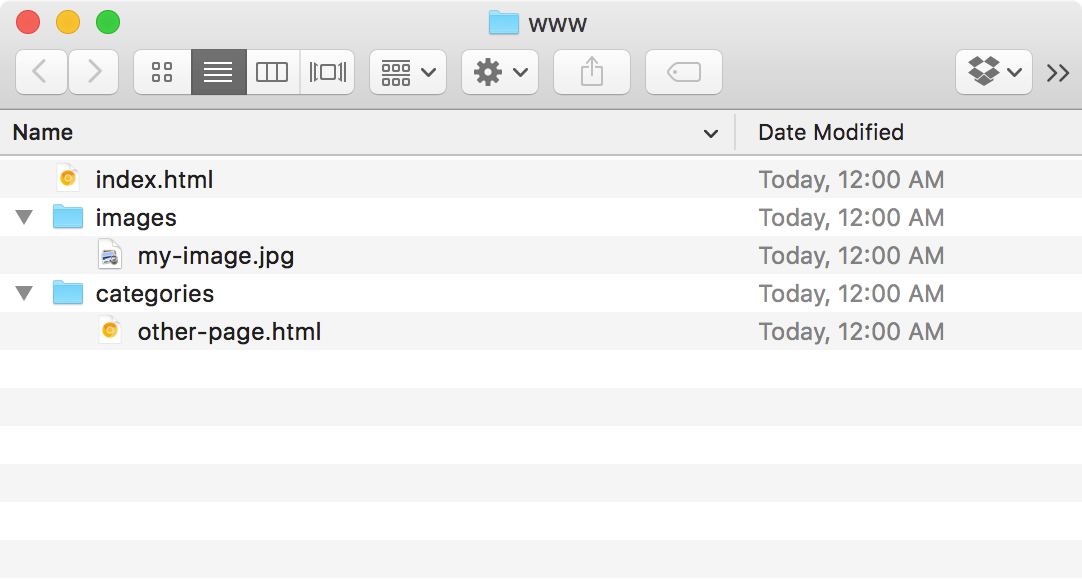
Now, as an example let's say we're working in another page called other-page.html in a subfolder called categories/.

If we try to add the image to this file using the same path we used before, we'll hit a dead end. other-page.html is down in the categories/ directory, not next to the images/ directory. We need to tell the browser to go up one level first, to the parent folder:
<img src="../images/my-image.jpg" alt="photo of me">../ is the shortcut for the parent directory. Now the image will work because the browser's directions are "From here, go up one level, then go into images, then find my-image.jpg"
The concept of relative paths is very important. Let's practice this a little more, after we finish with our html.
Hyperlinks
Hyperlinks are the strands that connect just about everything on the internet. They're really simple to make:
<a href="http://www.google.com">Link to Google</a>That's all there is to it. Everything between the opening and closing <a> tags is the hyperlink text that gets displayed, and an href pointing to the destination is the only attribute you need. <a> stands for "anchor", and href stands for "HTTP reference".
Here's what the above code looks like: Link to Google
Hint: Text isn't the only thing you can wrap in anchor tags.
Now, since this link takes us somewhere outside of our web site, you might want the browser to open it in a new tab (or window, depending on the user's settings).
<a href="http://www.google.com" target="_blank">Link to Google</a>Tip: Be careful not to overuse target="_blank". Generally you don't want to open new tabs for links within your own web site, and many leave it up to the user completely, since we can always right click, or CMD/CTRL or SHIFT-click to open links in a new tab.
Hyperlinks can also jump to different parts of a page. Let's say you give a tag in your document an id:
<section id="section5">
    <h2>The Fifth Section</h2>
    ...
</section>
IDs are represented by a # symbol. To jump to that part of the web page you'd use:
<a href="#section5">Link to Section 5</a>This kind of link is useful on longer pages (e.g. building a table of contents), or at the bottom of a long page when you want to let users quickly go back to the top.
File Paths
One last thing - a clearer explanation about file paths.
File paths pointing to resources (links, images, etc) on a web site can either be relative or absolute.
A relative path points to a resource relative to the page we're working on. For our purposes, this kind of path is best for anything that's stored on your hard drive.
An absolute path is a full URL, meaning it doesn't matter "where we are", the link works no matter what. You'll use absolute paths to link to resources or web pages elsewhere on the internet.
Let's create a second page and add some links to finish the demo.